
The fastest tire pressure is an optimization problem, which can be solved well with the right tools and will make you faster for free. Depending on where you are coming from, you may be looking at gains of 2% and much more. For free! The online calculators from Silca or SRAM will help you make prudent choices based on the surface conditions of the course, race strategy, and equipment. Given the physics of the problem, generally err on the side of lower pressures, which makes a case for tubeless setups and tire width of 28 mm and more for most riders.
This article is covered on the Faster Bike Podcast. Subscribe and stay faster, even while pedaling!


Why is the optimal tire pressure so important?
Even if you run the fastest tires, all is lost with the wrong tire pressure. The good news is that once you understand how to find your optimal tire pressure, you can adopt and optimize without spending any money. A good and accurate pump will help you adjust and run the fastest pressure every time. In particular, the newer cordless compressors such as Makita DMP180 or Bosch Universal Pump are a convenient option.
The upcoming chapters will explore the physics and variables that affect the ideal tire pressure. Alternatively, you can skip right to the practical application section or start with the video below, where Si from GCN conducts his own tire pressure experiment.
Just because it feels faster, it probably isn’t
Not until recently, road cyclists used to pump their tires as hard as they could, going for 8 bars (> 120 PSI) or even more. It made intuitive sense and even felt faster. One reason is that a hard tire translates more vibrations to the rider, and we associate more vibrations with speed. Similarly, you will feel pretty fast in a small, shaking car on the highway and not even realize the same speed in a comfortably suspended limousine. Yet, it is precisely these vibrations that slow us down! But let’s take a step back.
Just because it feels faster on narrow road bike tires filled up to the maximum, it doesn’t mean it is. The vibrations that give you a sense of speed actually slow you down!
On the smooth surfaces of testing rigs, the highest pressures are still fastest
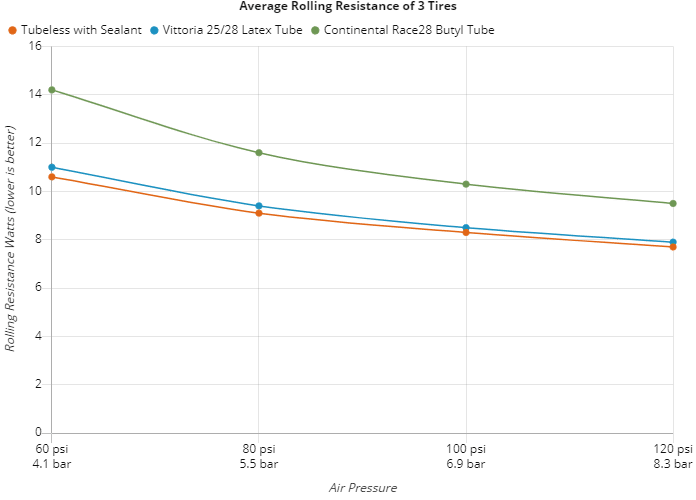
We already discussed in another post that bike tires undergo constant cycles of compression and decompression at the bottom part of the wheel when they are squeezed between the rider’s weight from the top and the pavement from the bottom. Every cycle, the energy lost due to compression is slightly more than the energy regained from the bounce back. That difference translates into heat and is called casing loss, which the best tires minimize. Interestingly, one way to reduce this casing loss is by pumping the tire to the highest pressure, minimizing compression and, therefore, loss. In a lab scenario, the way BicycleRollingResistance tests the tires, this is fully reproducible, as the graph below shows.
It shows the combined average rolling resistance for 3 tires: Vittoria Corsa Speed G+ 2.0, Schwalbe Pro One TT and Continental Grand Prix 5000 S TR. One line for a butyl tube setup (green), one for a latex inner tube (blue), and one for a tubeless (orange). Independent of setup, the higher the pressure on the x-axis, the lower the rolling resistance. Based on the data in the graph below, it is evident that the most efficient option is tubeless, which has already been covered in another blog post.
Outside on the road at some point, suddenly the physics change
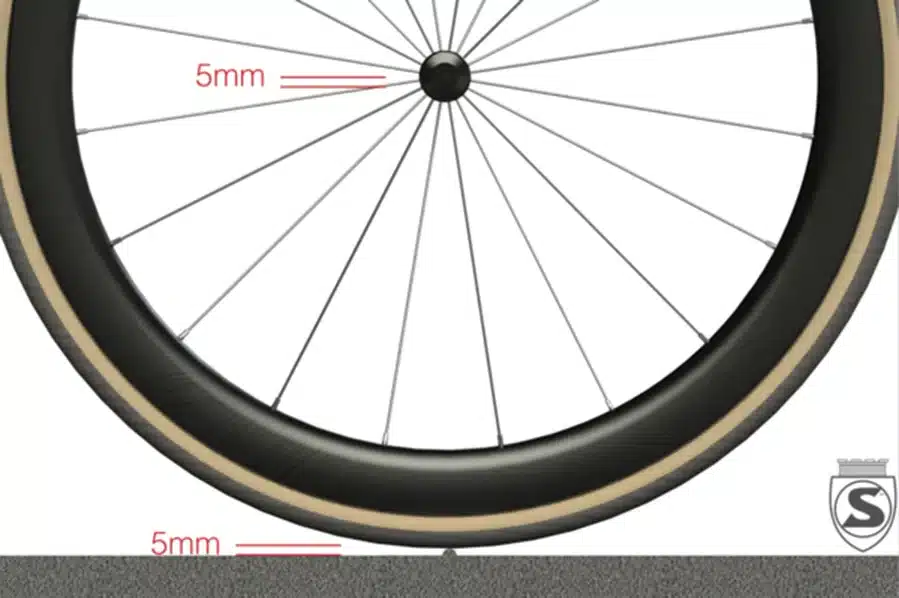
Everything discussed until now is accurate, but there is a crucial aspect that needs to be considered when it comes to road cycling in the real world: impedance loss. Imagine a perfectly hard tire, once it hits a little 5mm pebble stone on the road, it won’t deform, but the whole system of bike and rider has to be lifted up accordingly by those 5 mms (left picture). This is a huge energy loss! As a cyclist, you experience vibrations that can tire your muscles and slow you down.
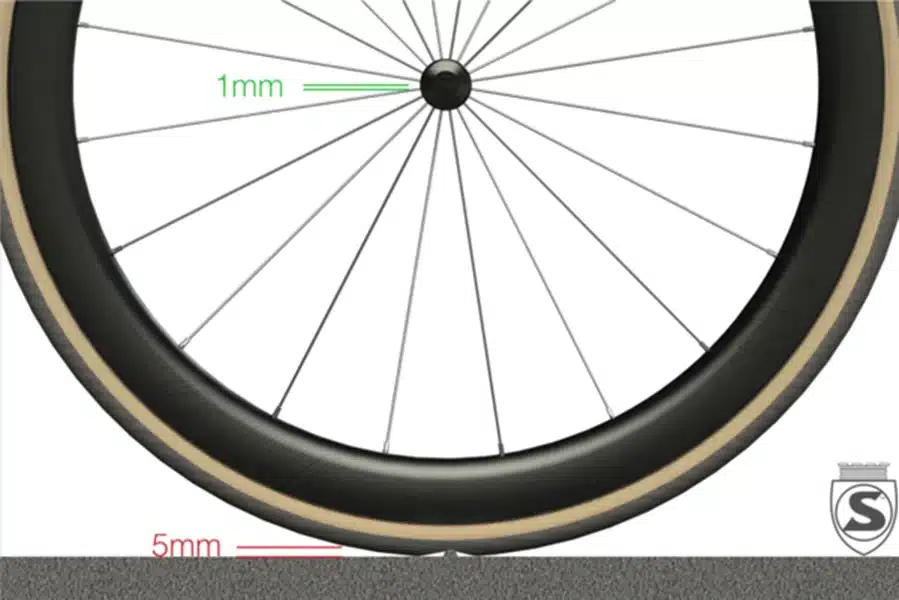
On the right side, a tire that has been optimized is depicted. When it encounters a pebble, it slightly deforms, causing the entire system to lift only by 1 mm. This results in less energy loss and faster movement.
The fastest tire pressure is an optimization challenge
In summary, you would want to have tire pressure as high as possible to minimize the casing losses from tire deformation, yet not too high that you run into impedance losses. Below, you can see a graphical illustration of the effect. The y-axis shows the rolling resistance, of course, lower is better, and the x-axis shows the tire pressure increasing from left to right.
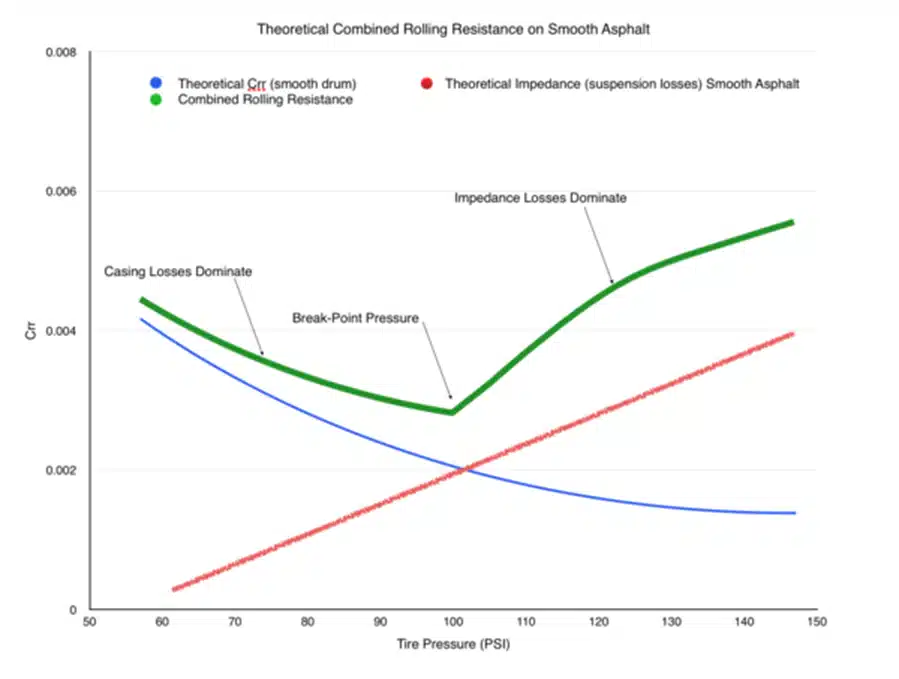
Following the green line from left to right, we can observe that the rolling resistance reduces as the tire pressure increases. However, at the break-point pressure, the resistance suddenly increases significantly due to the impedance losses taking over. The pressure at this point, in the graph, around 100 PSI, would be the optimal pressure for this scenario. However, being a little higher drastically increases rolling resistance, whereas being a little lower has less effect. In this example, if you are at 90 PSI, the rolling resistance is slightly higher than optimal. However, if you go to 110 PSI, it is similar to pumping the tire at only 65 PSI.
It’s better to have slightly low tire pressure on your bike than too high. High tire pressures are the fastest in the lab or on the velodrome. However, when the surface is as rough as tarmac, everything changes.
Now that we understand the general relationship, the real question arises: How can we find and determine the optimal bike tire pressure for our setup?
Practical guide to finding the fastest tire pressure
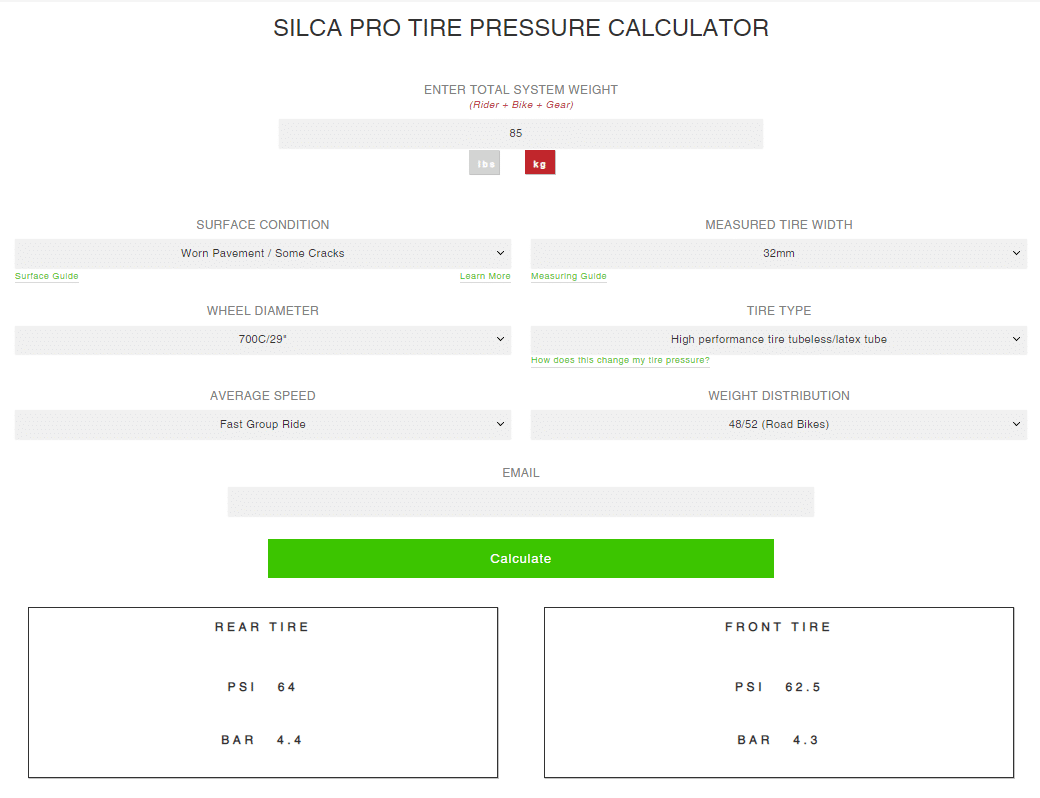
With the understanding of the physics in mind, finding the fastest tire pressure is quite complicated as it would require testing many factors. Luckily, however, Silca and SRAM have each provided a tire pressure calculator tool, which can be used as a starting point. You can see the screenshots below:
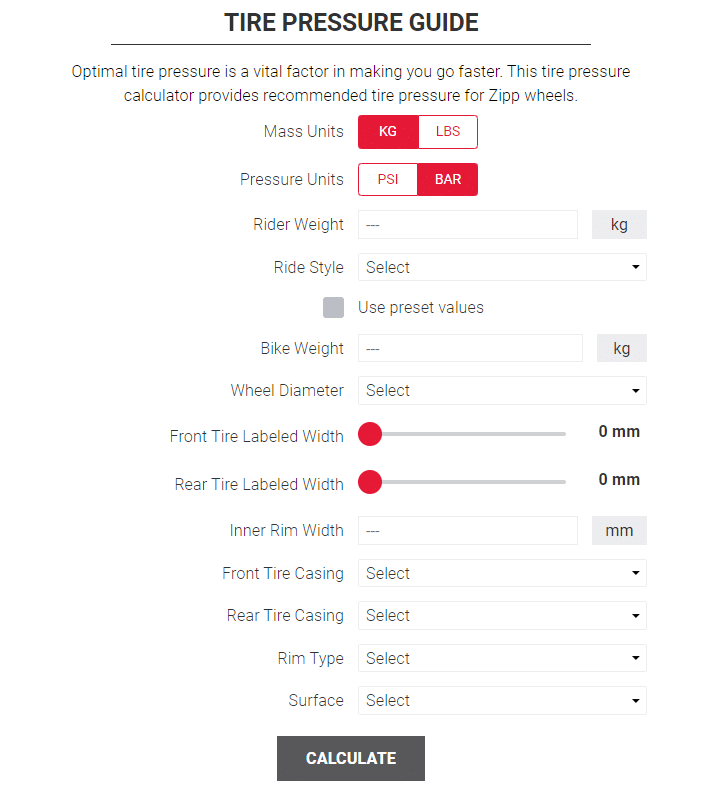
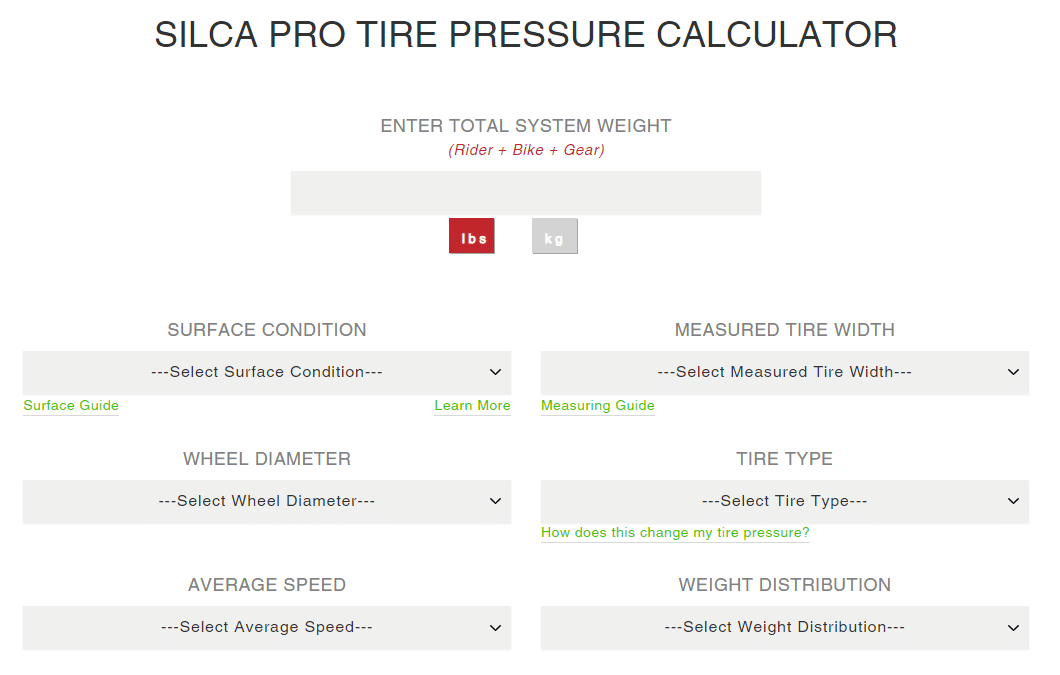
Online Calculators from Silca and SRAM provide a good starting point for the fastest tire pressure
These calculators provide a good starting point for the fastest tire pressure and cover the most critical factors. As an overview, you find them listed in order of importance. For details on the Silca calculator, you can also watch an explanatory video on Youtube.
- Weight of the system: The more weight, the higher the pressure. This includes the rider, bike and all gear. Best determined by a fully kitted weigh-in of rider, bike including filled water bottles and all accessories. You may be surprised!
- Surface condition: The rougher the surface, the higher the impedance losses as the obstacles the tire has to overcome are getting bigger. Think minor roughness of new tarmac versus big rocks on gravel. In the SRAM calculator, this is covered as part of the ride style.
- Tire width: This is really important and changes optimal pressure significantly. Wider tires have more air inside and allow for lower pressures. The tire’s width depends on the rim’s inner width and is often very different from what is written on the sidewall. Therefore SRAM tries to estimate and Silca asks you to measure with a good caliper, such as the Park Tool DC-1.
- Tire type or Tire casing: It is important to avoid tire pressures getting too low and risk pinch flats with inner tubes. Also, high-quality tires, especially with tubeless setup, are more pliable and, therefore, can be run at higher pressures.
- Rim type or Wheel diameter: Smaller rims also behave slightly differently depending on the tire size, as their angle toward an obstacle is different. Conversely, a small wheel diameter, such as 650b with a big gravel tire, may have the same effective diameter as a 700c wheel with a smaller tire.
- Ride style, Speed and Weight distribution: Forces differ slightly depending on the riding style. As a consequence, faster riders need more pressure. Front tires could theoretically be run lower on flat surfaces. However, the load increases significantly when riding aggressively downhill or especially braking.
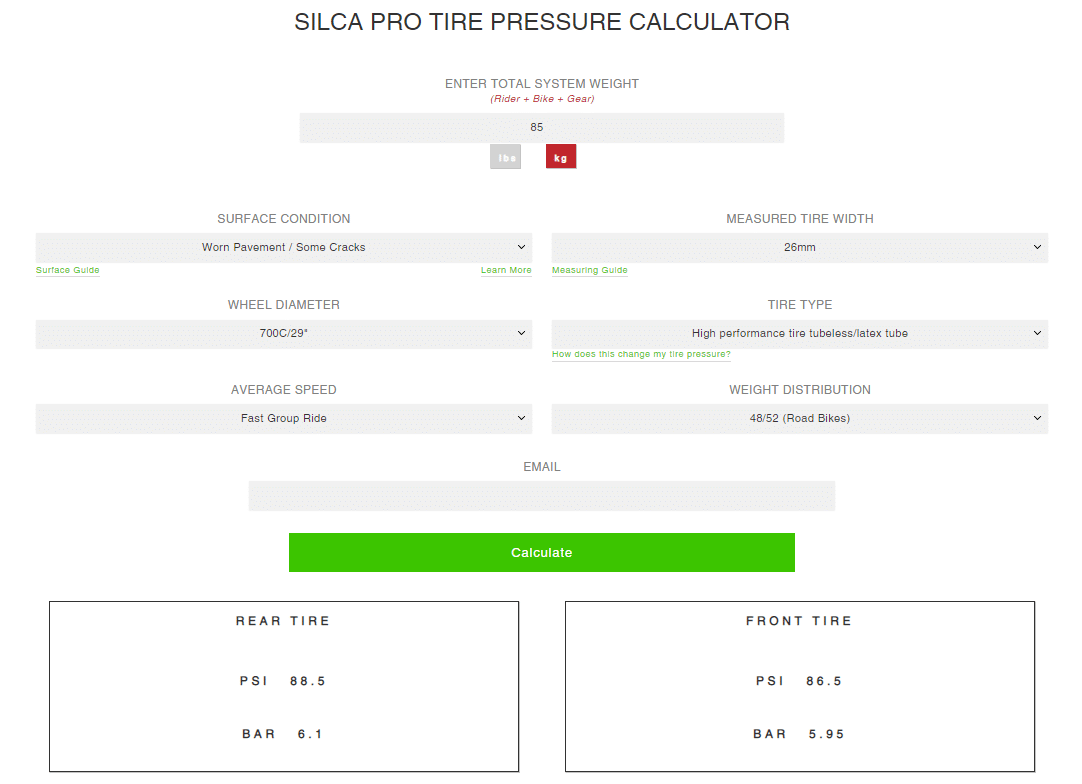
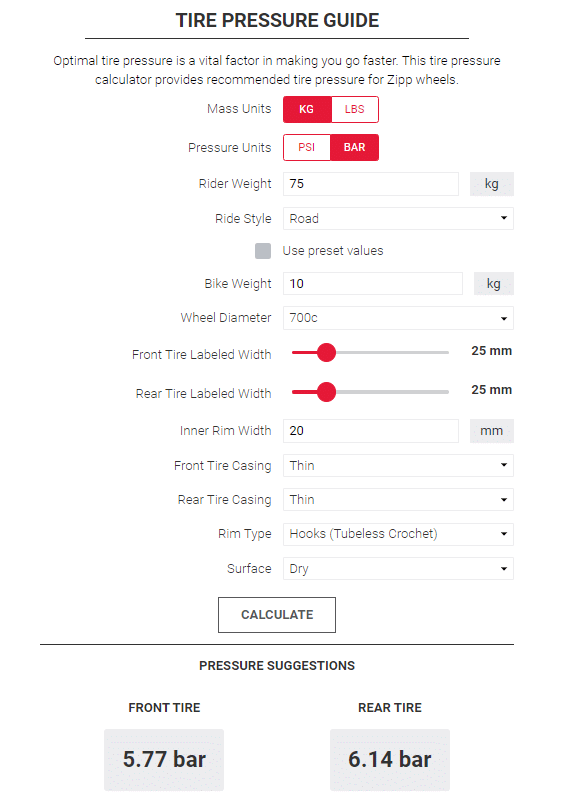
Case study: Comparing the Silca vs SRAM tire pressure calculator
To understand those calculators a little better, let’s run a couple standard scenarios to see what the results are for the average reader of this blog: Assume a 75 kg road bike rider on a 700C wheelset with a high-quality tubeless tire with a bike and gear weight of 10 kg (yes, don’t forget those water bottles, shoes, helmet, kit, repair kit…) riding on DT Swiss ARC 1100 wheels with an inner width of 20 mm and 25 mm high-quality tires such as Continental GP 5000 S TR or Vittoria Corsa Pro in a tubeless setup.
As you can see, both calculators return pretty similar values, except that Silca argues a higher pressure in the front wheel is needed for good handling and safety when braking. It probably also depends on whether you plan cycling in the Alps or at a touch-no-brakes flat looped criterium race.
The influence of system weight is significant yet maybe less than expected
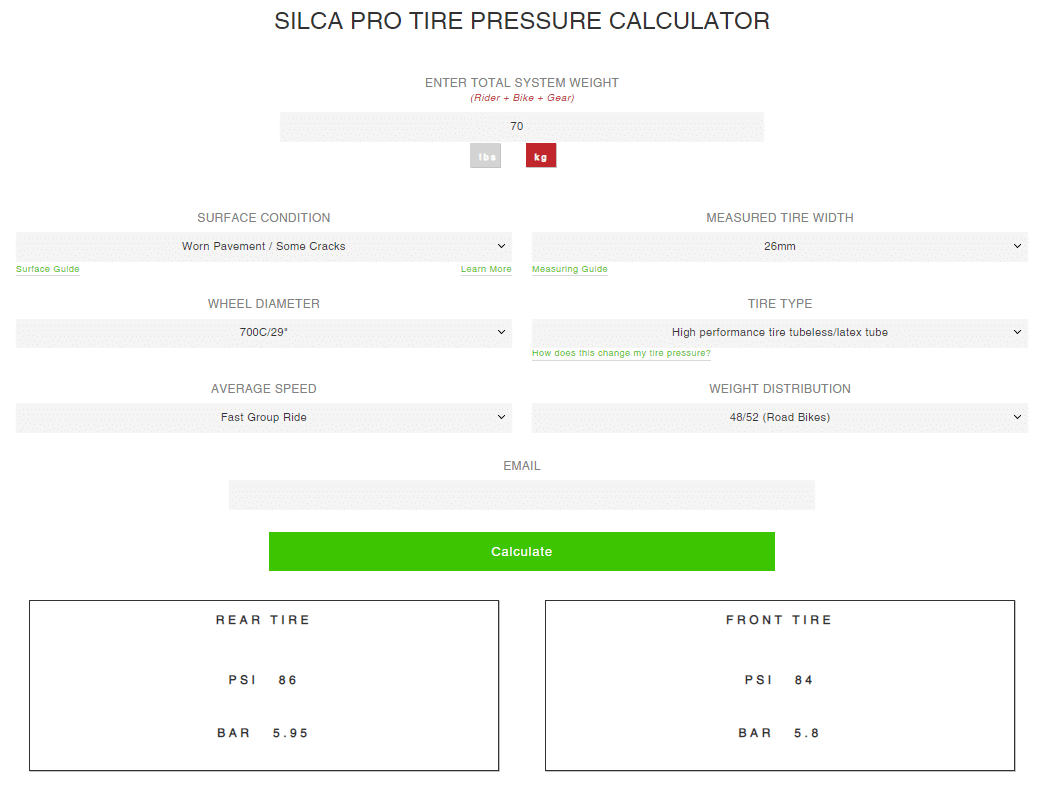
Let’s look at 3 different riders with the same gear: 60kg climber, 75kg all-rounder and 90kg sprinter. For simplicity, the Silca calculator will be used. In general, SRAM will provide similar values.
Maybe surprisingly to many, despite the quite significant differences in weight of 15 kg, values range from 5.95 bars (86 PSI) for the climber’s rear wheel to 6.3 bars (91 PSI) for the sprinter. So, in conclusion, once you have that ballpark number right, there is no need to adapt for daily variations of 1-3 kilograms based on changes in weight or gear taken.

Lower tire pressures for different road surfaces to ensure safety and success.
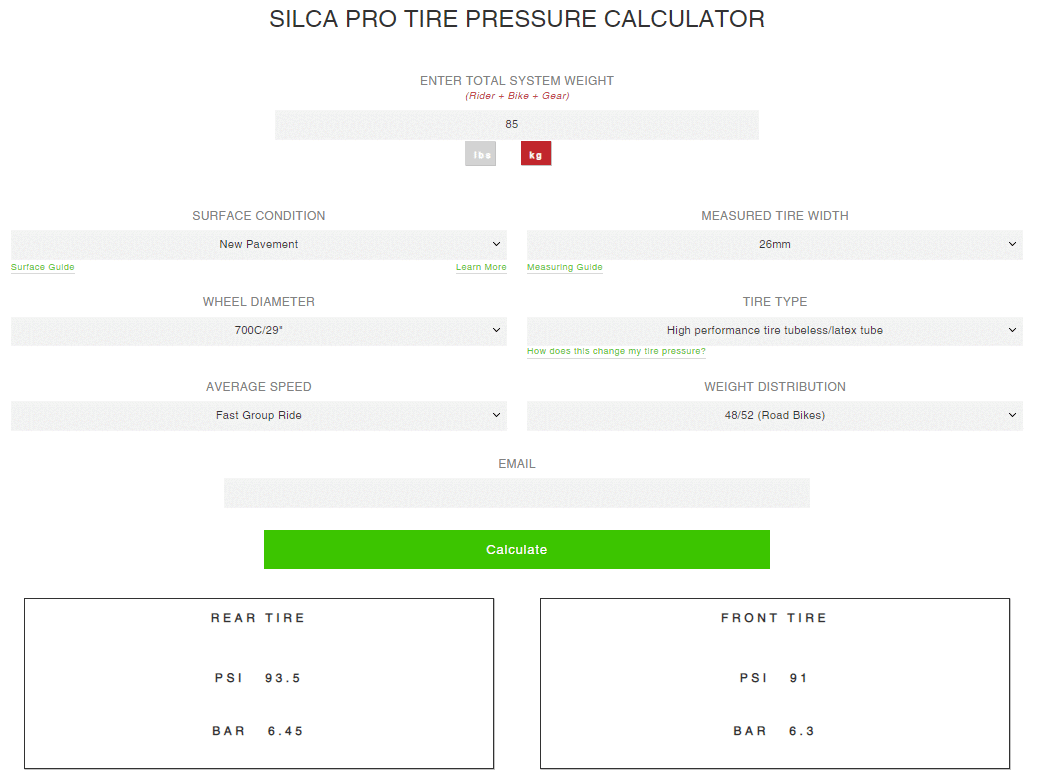
Let’s compare perfect new pavement to poor pavement and cobbles in this case. The recommended pressure for the rear tire is 6.45 bar (93.5 PSI) on new pavement, which reduces to 5.6 bar (81.5 PSI) on worn pavement and finally, only 5 bar (72.5 psi) for cobblestones. Quite significant!
Therefore, when looking at a course with different surfaces, the ideal tire pressure largely depends on the event type and the chosen race strategy. As we learned above, err on the side of lower pressure and optimize for the rougher sections. Most time is lost there. For a more elaborate race strategy, you may also consider which section of the course you need the maximum advantage. For example, in sections where the field is close together, it may not matter if your tire pressure is not optimal, but you may want it for the final climb or where you anticipate the attacks to happen.


Tire width greatly affects pressure, you want to measure it carefully
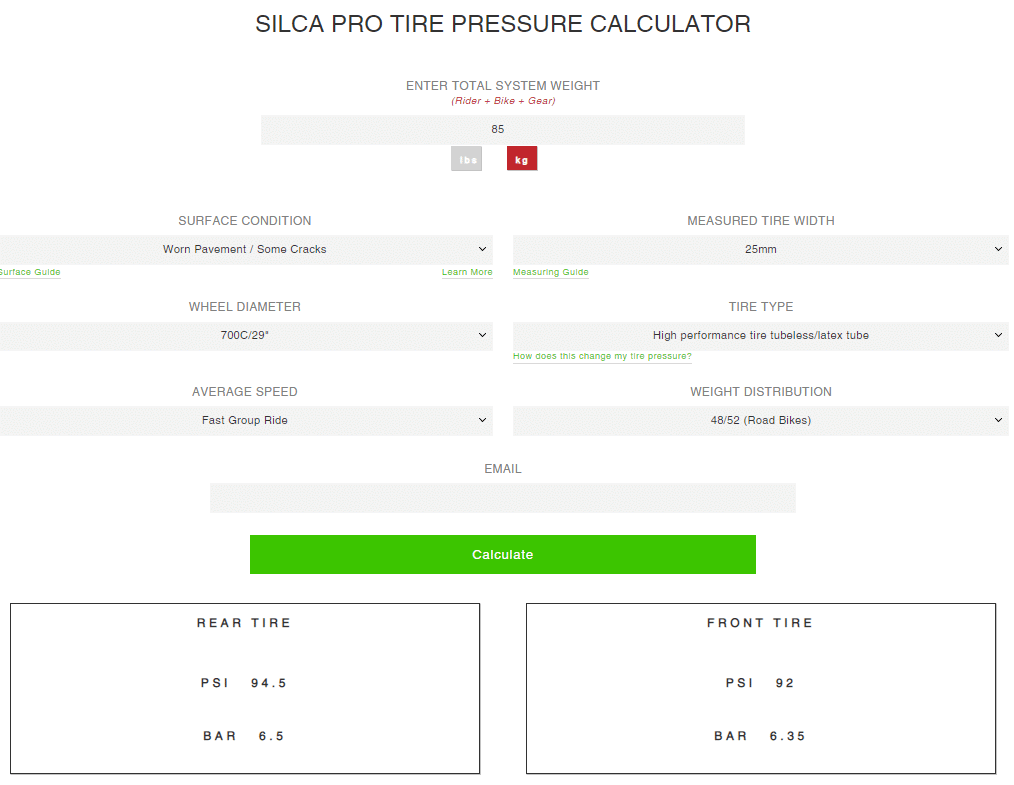
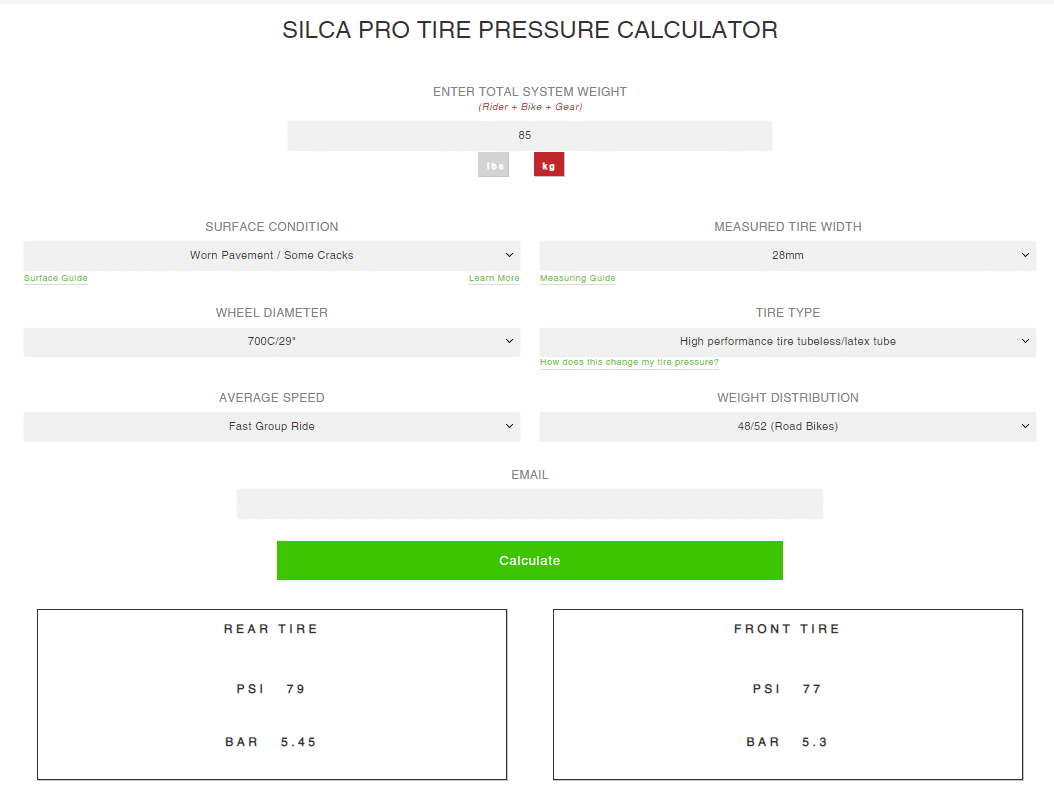
For this scenario, let’s look at 25mm, 28mm and 32mm road tires with our sample rider. The differences here are staggering. Adding a mere 3 mm tire width from 25 mm to 28 mm decreases the pressure by 1 bar, going from 6.5 bar (94.5 PSI) to 5.45 bar (79 PSI) and just another drop for the wide 32 mm tires. Of all parameters, this is the most sensitive. Therefore it is highly recommended to have a good caliper at hand to measure tire width precisely, as just 1 mm makes a more significant difference than even a couple of kilograms of weight difference.
This information also sheds light on the growing trend of using wider tires in professional cycling, particularly on roads that are not in perfect condition. Additionally, opting for a wider tire can greatly enhance comfort during long-distance rides, ultimately leading to faster speeds.
There is just one downside: a wider tire is also less aerodynamic. Many current wheels, for example, the DT Swiss ARCs, are optimized for 25 mm tires for the best aero performance. This is another optimization problem we will look into in another blog post.
Tire type, weight distribution, surface and average speed have minimum influence
All the other parameters on the calculators have, of course, an influence but are not very significant. Still, it’s good to set them accordingly, and they may point in the direction of a little more or a little less pressure. Ultimately, you end up with a suggestion that will be pretty close to the optimum for your given scenario. From now on, experiment, maybe test and see how it feels. As said before, generally, err on the side of less pressure than too much.
The optimal tire pressure depends on the type of surface, tire width, and vehicle weight, in that order. Determine your desired speed on the race course, select the appropriate tire width, and, as always, minimize weight.
Finally: A practical guide on setting the fastest tire pressure
After all this information, let’s go through a step-by-step approach to finding the optimal tire pressure.
- Decide on the road surface conditions you want to optimize for. Prioritize for the rougher conditions.
- Measure your actual tire width accurately with a caliper. As said before, it changes with inner rim width, and the one printed on the side wall may not be accurate.
- Weigh yourself in the complete kit, with the bike and, most importantly, full water bottles and all accessories, such as repair kits.
- Use the online calculator and select all other parameters accordingly.
- Pump your tires with a high-quality pump with an accurate pressure gauge and go out riding. How does it feel?
- Don’t get fooled by the missing vibrations if you are coming from high pressures. They were slowing you down.
- Rather check for signs that pressure may be “too low”, such as bad control on descents, while cornering or risk of flats when smashing over potholes.
- Experiment a bit, and err on the lower pressure side if unsure. It may take a little exploring.
- For races, decide on your strategy and adapt to the pressure depending on the event. Maybe a little higher for a high-speed crit on smooth roads and a little lower (or wider tires) for that ultra grandfondo event of 250 km with many small roads on bad pavement and some gravel sections.
- If you can’t bring your floor pump to an event, just pump the tires at a higher pressure and use a little tool like the Fumpa Gauge or Silca Truth Gauge to deflate to the appropriate pressure just before the start.
- Bonus tip: Use a tire marker such as the Edding 8050 tire marker to write the pressure on the non-drive side (we want clean pictures, after all), just next to the valve. Then, you never need to remember the pressure and can quickly adjust.
 Made me Slower
 Same, Same
 Made me Faster